Lunduke
News • Science & Tech
How To: Install 9front (a Plan 9 fork)
June 21, 2023
post photo preview

Looking to install 9front -- a fork and continuation of the legendary Plan 9 Operating System from Bell Labs -- but don't know where to start?

I don't blame you.  Plan 9 (and 9front) are quite a bit different than most modern systems.  And even running through the installation can be more than a little intimidating to users new to the system.

The good news?  Installing 9front is actually pretty doggone simple.  Weird.  But simple.  Truth be told you'll simply be hitting ENTER a whole lot.

Like.  A crazy amount.  Seriously.  The ENTER key will be your friend today.

Let's begin and get your started on your journey into 9front.  (Most of these instructions will be very similar for many Plan 9 - based operating systems.)

Step 1) Download the ISO and boot off it

Grab an .ISO for your system (32bit, 64bit, Raspberry Pi, etc.) from 9front.org.  Then boot off of it.

I used VirtualBox with 2048MB of RAM, a 32bit CPU, and a virtual hard drive with 20GB of storage.  What you choose is up to you.  But, pro tip, if you have errors during the later stages of the installation, you may not have a large enough hard drive partition.

Hit ENTER to accept the defaults for boot arguments, resolution, and mouse port.

I told you... you'll hit ENTER a lot during this installation.  When in doubt... hit ENTER.

The default Plan 9 graphical desktop, known as "rio", will then load.

Step 2) Start the installer

You'll note that there's no Start Menu.  Or Dock.  Or... anything other than a small system monitor and a terminal.

Type the following into the terminal to start the installer:

inst/start

The installer is entirely text-based and will ask you just a couple of questions.  I recommend hitting Enter to accept the default settings for the first three prompts ("configfs", "cwfs64x", "partdisk").

Note that the installer will show you a list of "unfinished tasks" to do.  At the beginning, it is likely only to have a handful of tasks lists.  3 or so.  Don't believe it.  That list will magically grow as the installer continues.

Don't worry, though.  Each step is pretty easy to get through.

Step 3) Set up your partitions

At this point you'll need to partition your disk to have a Plan 9 partition.

Choose which disk you would like to partition, and what kind of partition table you would like to use.

And then you'll choose to use MBR or GPT.  I chose MBR here, but either way is fine.  (Note: type the option in all lower case.  Upper case will be ignored.)

Then type the following:

w

[HIT ENTER]

q

[HIT ENTER]

Then hit ENTER to choose the next default ("prepdisk"), and hit ENTER again to choose the default partition to use (which is supposed to be the one you just got done creating).

Once again, accept the defaults suggestions by typing the following:

w

[HIT ENTER]

q

[HIT ENTER]

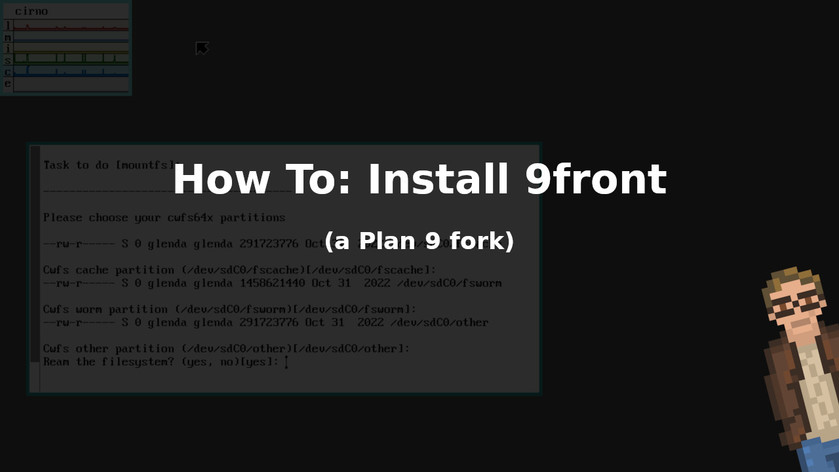
Then hit ENTER to choose the next default ("mountfs"), and hit ENTER again to choose the default partiion suggestions for the Cache, Worm, Other partitions.

Then hit ENTER to choose the default ("yes") "to "Ream the filesystem".

Step 4) Choose the type of system (local)

Then hit ENTER to choose the next default ("configdist") and hit ENTER to choose a "local" system.

Step 5) Configure your networking

Then hit ENTER to choose the next default ("confignet").

You will then choose either "manual" or "automatic" to choose how your network will be configured.  I selected "automatic" to use DHCP.

Step 6) Copy the files!

Here we go!  Now we're ready to actually copy all of the system over to the hard drive!  Huzzah!

And, like with most of the steps, the ENTER key is going to be your friend.

Hit ENTER to choose the next default ("mountdist").

Choose the defaults (hit ENTER) unless the paths for your system are incorrect.

Hit ENTER again to select "/" as the location of the distribution archives.

Hit ENTER to select "copydist".

At this point all of the files for your installation are being copied to their proper locations in the partitions that you created in the earlier steps.  This won't take very long.  Plan 9 simpy isn't that large (size-wise).

Step 7) Name your system

Hit ENTER to select "ndbsetup".

The default can be chosen ("circno") or you can set a different name for your local sytem.  Totally up to you.  If you plan to have multiple Plan 9 systems running on your home network, I recommend choosing a unique name so that you can really make the most out of your Plan 9 experience.

Step 8) Set the timezone

Once again, hit ENTER to choose the next default ("tzsetup").  This will allow you to set the timezone for your machine.

Phew.  Almost done.  Only a few more ENTER's to hit.

Step 9) Set the partition to boot your system from

Hit ENTER to select "bootsetup".

Then, you guessed it, hit ENTER to choose the default Plan 9 partition (or enter another for yourself).

Type "yes" to install the Plan 9 master boot record.

Type "yes" to mark the Plan 9 partition as active.

And -- oh, boy! -- the grand finale is here!

Step 10) Finish and reboot!

Type "finish" and hit ENTER!  Shazam!

That's it!  You're done!  Eject the ISO (or thumb drive... whatever you had your install media on) and your system will now be able to boot into 9front (or Plan 9)!

You may be wondering, at this point, how to actually use your new 9front-powered computer.  I don't blame you.  Even if you are a UNIX-master, Plan 9 based systems can feel pretty foreign.

But that, my friends, is a topic for a different day.


Copyright © 2023 by Bryan Lunduke.  All rights reserved.  The contents of this article are licensed under the terms of The Lunduke Content Usage License.
community logo
Join the Lunduke Community
To read more articles like this, sign up and join my community today
16
What else you may like…
Videos
Podcasts
Posts
Articles
GNOME Declares War on Framework Computer

GNOME OS Team says Framework "supports Fascist and Racist s***heads", "does not feel comfortable in further collaboration". GNOME Board wants to talk to groups "reconsidering working with Framework".

More from The Lunduke Journal:
https://lunduke.com/

00:19:09
November 06, 2025
Can We Trust Rust?

Debian Linux and Ubuntu are forcing adoption of Rust at core levels of the system. Considering the large numbers of Leftist Extremist Activists among Rust developers... can that software be trusted?

More from The Lunduke Journal:
https://lunduke.com/

00:24:30
November 05, 2025
Devuan 6.0 Released: No Systemd & Non-Woke Debian

Devuan's Code of Conduct: "We accept everyone's contributions, we don't care if you're liberal or conservative, black or white, straight or gay, or anything in between!"

More from The Lunduke Journal:
https://lunduke.com/

00:14:08
November 22, 2023
The futility of Ad-Blockers

Ads are filling the entirety of the Web -- websites, podcasts, YouTube videos, etc. -- at an increasing rate. Prices for those ad placements are plummeting. Consumers are desperate to use ad-blockers to make the web palatable. Google (and others) are desperate to break and block ad-blockers. All of which results in... more ads and lower pay for creators.

It's a fascinatingly annoying cycle. And there's only one viable way out of it.

Looking for the Podcast RSS feed or other links? Check here:
https://lunduke.locals.com/post/4619051/lunduke-journal-link-central-tm

Give the gift of The Lunduke Journal:
https://lunduke.locals.com/post/4898317/give-the-gift-of-the-lunduke-journal

The futility of Ad-Blockers
November 21, 2023
openSUSE says "No Lunduke allowed!"

Those in power with openSUSE make it clear they will not allow me anywhere near anything related to the openSUSE project. Ever. For any reason.

Well, that settles that, then! Guess I won't be contributing to openSUSE! 🤣

Looking for the Podcast RSS feed or other links?
https://lunduke.locals.com/post/4619051/lunduke-journal-link-central-tm

Give the gift of The Lunduke Journal:
https://lunduke.locals.com/post/4898317/give-the-gift-of-the-lunduke-journal

openSUSE says "No Lunduke allowed!"
September 13, 2023
"Andreas Kling creator of Serenity OS & Ladybird Web Browser" - Lunduke’s Big Tech Show - September 13th, 2023 - Ep 044

This episode is free for all to enjoy and share.

Be sure to subscribe here at Lunduke.Locals.com to get all shows & articles (including interviews with other amazing nerds).

"Andreas Kling creator of Serenity OS & Ladybird Web Browser" - Lunduke’s Big Tech Show - September 13th, 2023 - Ep 044

It's been a crazy few weeks, and this week has been quite rough so I haven't been online very much, but I wanted to share the latest podcast episode with all of you. It was my first time conducting an interview and it was with our very own @leebase. We actually recorded it a couple weeks ago and the video was released to my paid subscribers, but now the audio version is available to everyone. Many thanks to Lee for coming on the show to share his insights into AI and what it holds for all of us moving forward. I would love to hear feedback and/or suggestions for future shows. Enjoy!

https://retropunk.substack.com/p/rmp-048-ai-and-our-future-an-interview

4 hours ago

We all knew the day was coming. Start mapping out your Plan B. Cause Archive . Today is as the "cool kids" would say, cooked.

FBI Tries to Unmask Owner of Infamous http://Archive[.]is Site
https://archive.ph/GG29L

post photo preview
November 06, 2025
50% off Lunduke Journal subs extended through Nov 10th

Just a quick heads up:

The Lunduke Journal has a 50% off discount on all types of subscriptions — Monthly, Yearly, and The World Famous Lifetime Subscriptions (tm). And that discount has been extended through this coming Monday (November 10th).

Just for kicks.

All of the details are right here.

Or you can always go to Lunduke.com and click the fancy-shmancy “50% off” link.

Here’s a map on how to find that link.


Think of it like a treasure map. Only better. Because you don’t need to stand up and walk. Walking is hard.

-Lunduke

Read full Article
November 01, 2025
$3/Month, $27/Year, $150/Lifetime for The Lunduke Journal

For those who missed it:

50% off Lunduke Journal subscriptions through Monday (Nov 3rd).

At half-off, that means the price of a full Lunduke Journal is:

  • $3 / Month (normally $6)
  • $27 / Year (normally $54)
  • $150 / Lifetime (normally $300)

No matter which subscription you choose, you get all of the perks.

Plus, Lifetime Subscribers get two extra goodies:

Pick whichever type of subscription you want, get some cool perks, feel awesome about supporting Big-Tech Free, non-Woke Tech Journalism.

-Lunduke

Read full Article
October 30, 2025
50% Off The Lunduke Journal through Nov 3rd

Holy moly, there’s a lot of new Free Subscribers to The Lunduke Journal!

As a way of saying “Welcome!” to all of you new people, here’s a little (well… big) discount on full subscriptions.

50% off all types of Subscriptions (Monthly, Yearly, and Lifetime) through November 3rd (Monday).

All of these discounted Subscriptions come with all of the perks:

  • DRM-Free MP4 Downloads of all videos.

  • Full access to the exclusive forum.

  • And a bunch of nerdy eBooks.

Scroll down. Pick whichever subscription type makes sense to you — ranging from a $3 monthly sub… to a Lifetime subscription (I highly recommend picking one up, it is so choice).

Then grab some of those perks and pat yourself on the back for keeping truly independent, Big-Tech free Tech Journalism alive and kicking!

50% Off Yearly or Monthly Subscriptions:

Available via both Locals and Substack. (This includes full access the community Forum, and all other perks.)

That means $3 / Month. Or $27 / Year (which works out to $2.25 / Month).

Via Lunduke.Locals.com:

Via Lunduke.Substack.com:

Note: You can also grab a Monthly subscription via X, YouTube, or Patreon. There’s no way to offer a discount on those platforms. But those are still good options!

The Famous Lifetime Subscription:

The “World Famous Lunduke Journal Lifetime Subscription” is exactly what it sounds like. Pay once and get full access to The Lunduke Journal. For life.

Now, through Monday, November 3rd, you can snag one at a crazy discount. Normally these are $300… but you can grab one for $150. (You can also pay more if you’d like to donate a little extra.)

The Lifetime Subscription can be obtained via Locals, Substack, or using Bitcoin. All three options work great and are super easy (& all three include access to all of the perks). Scroll down and choose your option.

Note: The Lifetime Subscription only applies to Substack and Locals. Other platforms (such as X, Patreon, & YouTube) do not provide the functionality necessary to create Lifetime Subscriptions.

How to get a Lifetime Subscription via Locals:

  1. Go to Lunduke.Locals.com/support.

  2. Select “Give Once“.

  3. Enter “150“ (or more) into the amount field.

  4. After checking out, Lunduke will toss you an email once your account is set to full lifetime status. (This usually happens within a few hours.)

How to get a Lifetime Subscription via Substack:

  1. Go to Lunduke.Substack.com/subscribe.

  2. Select the “Lifetime Subscription” option.

  3. After checking out, Lunduke will toss you an email once your account is set to full lifetime status. (This usually happens within a few hours.)

If you would also like full, Lifetime access to Lunduke.Locals.com (which is included):

  1. Make a free account on Lunduke.Locals.com.

  2. Email “bryan at lunduke.com” with the email address you use on both Substack and Locals (can be different email addresses).

  3. Lunduke will toss you an email once your account is set to full lifetime status on Locals.

How to get a Lifetime Subscription with Bitcoin:

You can also obtain a Lifetime Subscription via Bitcoin.

bc1qyjakve8fywm8pz2v99v57yhjj0vzr2vjze6fcq

  • Email “bryan at lunduke.com” with the following information: What time you made the transaction, how much was sent (in Bitcoin), and the email address you use (or plan to use) on Locals.com or Substack.com (or both).

No matter which type of subscription you choose, thank you for your support! Every subscription goes directly towards keeping The Lunduke Journal running well into the future.

-Lunduke

Read full Article
See More
Available on mobile and TV devices
google store google store app store app store
google store google store app tv store app tv store amazon store amazon store roku store roku store
Powered by Locals